Flexible Templates in Wheelhouse CMS

When designing and building a web site, you'll rarely want every page to be laid out in exactly the same way. At a minimum you'll likely have a different layout for your home page compared to your interior pages. Larger sites will probably have even more design variations between pages.
The recent redesign of Rooftop Media, produced by Demarchi Design is a perfect example of this:
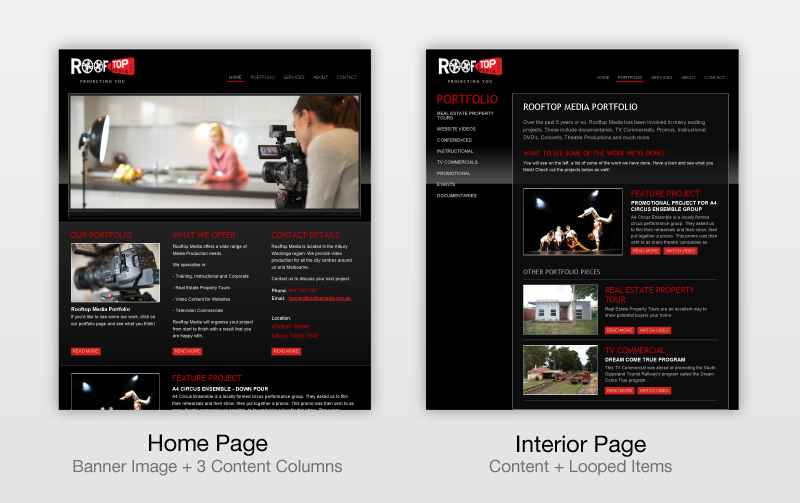
Although it's not a large site, the layouts of the home page and interior pages differ significantly. The home page features a large banner image and short columns of text, whereas the interior pages include a second level of navigation and a larger main content area with some featured projects below.
For a content management system, this presents a challenge in how the editing forms for each piece of content are presented to the user. Wheelhouse uses a template-driven approach that automatically builds the forms based on definitions within the templates.
What does this mean and how does it work in practice?
When you create a page in Wheelhouse, it is assigned a default template from your current theme (or you can select from any of the other templates that the theme provides). Wheelhouse reads the chosen template looking for content definitions (content, text, images and loops) and then automatically builds the form for content editing.
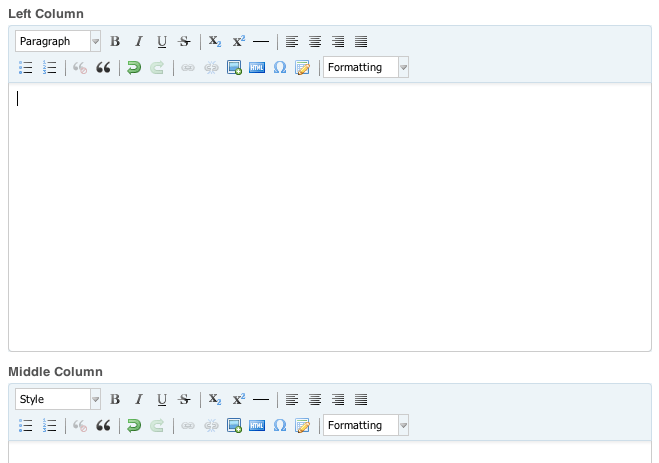
Here's how the columns section of the home page template looks:
<div class="callout left">
  <%= @page.content("Left Column", :rows => 20) %>
</div>

<div class="callout middle">
  <%= @page.content("Middle Column", :rows => 20) %>
</div>

<div class="callout right">
  <%= @page.content("Right Column", :rows => 20) %>
</div>
I'm using ERB in these examples but Haml is also supported (and is highly recommended).
The name and options passed to @page.content provide hints to Wheelhouse as to how to render the editing controls. Wheelhouse provides options to customize the field label, editor size, default value, help notice as well as the CSS used by the editor.
In the interior page template we do something similar but accept the default values:
<div id="content">
  <%= @page.content %>
</div>
These examples produce WYSIWYG editor controls such as those in the screenshot below:
For short single-lines of text (e.g. a section title), we can use the @page.text content method to generate simple text fields, complete with a default value and a note for the content creator.
<h2>
  <%= @page.text "Section Title",
                 :note => "Short explanatory notice.",
                 :default => "Default Title" %>
</h2>
which creates the following field in the form:

Images and looped content
Just like text content, images also receive first-class treatment in Wheelhouse CMS. Although images can be added to normal text content using the WYSIWYG editor, there are times when you as a template developer will want more control over how images are positioned and sized.
Wheelhouse provides the @page.image content method to place an image at any point within the template, allowing the content creator to choose the image from the Media Library. The width and/or height can also be specified in the template and the image will be resized accordingly.
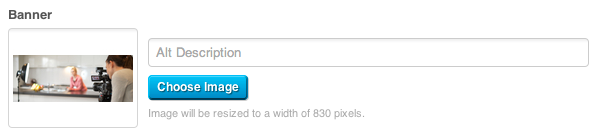
The banner image for the Rooftop Media home page can be defined in the template as:
<div id="banner">
  <%= @page.image "Banner", :width => 830 %>
</div>
This provides an image selector in the editing form that looks like this:
The final template content construct in Wheelhouse is the loop, which is used to create repeating items with a common structure, such as the portfolio pieces and featured projects in the Rooftop Media portfolio. It's also fantastic for creating simple slideshows and galleries, without the need for any additional plugins.
Any of the content, text or image methods described above can be used inside a loop. To illustrate, here's roughly how the featured projects are done:
<% @page.loop("Featured Projects") do |project| %>
  <div class="project">
    <%= project.image :width => 212, :height => 141 %>

    <div class="content">
      <%= project.content :rows => 10 %>
    </div>
  </div>
<% end %>
And here's how it looks within the editing form, with two items already added:

All of these template methods enable you to create easy-to-use editing forms (no matter how complex your templates get) that are far less prone to user error. You can say goodbye to panicked calls from clients saying they've mucked up the layout.
What's more, these template methods aren't limited to normal pages but can also be used on blog posts, forms and your own custom resource types.
So when will it be ready?
The final finishing touches are currently being added, including updating Wheelhouse to support Rails 3.1 (and the brand new asset pipeline). I'm also hard at work writing documentation for administrators and developers (include all the details for everything we covered in this post and much more), with the Site Administrator's Guide coming early next week.
There's no hard release date set (it'll be ready when it's ready) but there's definitely not long to go now.